Cryptography hash method MD2 (Message Digest 2) explained with Python

*** 05/05/21 new article available: MD4 algorithm python step by step, good foundations to understand modern hash methods MD5, SHA, … : https://nickthecrypt.medium.com/cryptography-hash-method-md4-message-digest-4-explained-with-python-f201b74f51d ***
MD2 is a basic hash function, and nice intro into what’s now used on a daily basis for crypto-transaction, password storage, … A fascinating function full of poetry.
Intro
I will voluntarily skip an extensive intro about what hash methods are, the history of message digest algorithms creation and why we do not find traces of MD1 (which, by the way, I don’t know — sources says : it has not been published and that’s a good enough reason).
I’ve always been fascinated by hash functions, the idea of encapsulating the infinite universe into a fixed limited number of bytes is beautiful to me (in spite of being mathematically impossible — for the infinite universe part).
Hence, this randomly picked MD2 signature c8c3cbb4b530034bac23565fa973f94f could be the signature of a text describing the solution to end humanity poverty or the hash of an adorable kitten picture… or both (as per my previous paragraph, collisions are inevitable and proven to happen on MD2).
In this article I want to vulgarize MD2 algorithm, and propose a step-by-step Python implementation to do so.
I hope you will enjoy reading it.
The initial M2 standard : RFC 1319
I will use the initial RFC doc as my standard source, it’s available here https://tools.ietf.org/html/rfc1319. Here again I won’t explain in this article the history of this algorithm and why it shouldn’t be implemented anymore.
The implementation below will be un-scalable by purpose, the intent being to understand how this algorithm works.
The RFC describes 4 steps to obtain the hash signature (I’m personally not convinced about the 3rd one being a “real” step):
- step 1: padding the message
- step 2: append checksum
- step 3: initialize digest
- step 4: process the message in 16-bytes blocks
- step 5: output
In order to understand each step we will process together a message with no computation / a.k.a. by hand.
The message will be a beautiful haiku poem by Masaoka Shiki:
After killing
a spider, how lonely I feel
in the cold of night!
We will consider this message with its special characters, meaning it would be the following string:
msg = “After killing\r\na spider, how lonely I feel\r\nin the cold of night!”It’s a 65 bytes message, if we split it in 16 bytes blocks this would translate into the below table.

As you know, characters are representation of ascii codes and the operations on string / characters are made at that “code” level. Which we can easily obtain, translating the string of char to an array of ascii codes.
msg = [ord(c) for c in msg]This would translate into the following table:

We can now proceed with the different hash steps.
Step 1: padding the message to have it match a 16-bytes length
As laid out in the RFC, padding occurs to have the message reaching a length of 16 bytes. It means that the pad filler will have a length of 16 minus the length of the message % 16. The value of the bytes will be the len of the pad.
In our example, we are missing 15 bytes to reach a full last block. Hence we would need to to add 15 bytes of value 15.
BLOCK_SIZE = 16
padding_pat = BLOCK_SIZE - (len(msg) % BLOCK_SIZE)
padding = padding_pat * [padding_pat]
msg = msg + padding
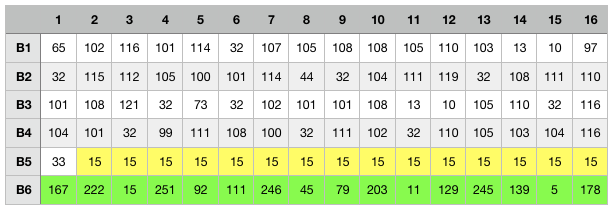
As you can expect, the table looks as per the below:

Step 2: Calculate and append checksum
*** important note: thanks to Kevin Knight who rightfully mentioned that the mainstream version of the RFC 1319 shows a mistake in its pseudo code calculating the checksum, corrected in the errata EID 555: https://www.rfc-editor.org/rfc/inline-errata/rfc1319.html — indeed the checksum is itteratively xored to its previous position and not scrapped at each itteration, thanks again Kevin ***
Checksum calculation needs us to meet with the substitution table of the MD2 algorithm. It consist in a table of 256 elements, which has been chosen to be decimals of PI.
Here is our friend:
S = [
41, 46, 67, 201, 162, 216, 124, 1, 61, 54, 84, 161, 236, 240, 6, 19,
98, 167, 5, 243, 192, 199, 115, 140, 152, 147, 43, 217, 188, 76, 130, 202,
30, 155, 87, 60, 253, 212, 224, 22, 103, 66, 111, 24, 138, 23, 229, 18,
190, 78, 196, 214, 218, 158, 222, 73, 160, 251, 245, 142, 187, 47, 238, 122,
169, 104, 121, 145, 21, 178, 7, 63, 148, 194, 16, 137, 11, 34, 95, 33,
128, 127, 93, 154, 90, 144, 50, 39, 53, 62, 204, 231, 191, 247, 151, 3,
255, 25, 48, 179, 72, 165, 181, 209, 215, 94, 146, 42, 172, 86, 170, 198,
79, 184, 56, 210, 150, 164, 125, 182, 118, 252, 107, 226, 156, 116, 4, 241,
69, 157, 112, 89, 100, 113, 135, 32, 134, 91, 207, 101, 230, 45, 168, 2,
27, 96, 37, 173, 174, 176, 185, 246, 28, 70, 97, 105, 52, 64, 126, 15,
85, 71, 163, 35, 221, 81, 175, 58, 195, 92, 249, 206, 186, 197, 234, 38,
44, 83, 13, 110, 133, 40, 132, 9, 211, 223, 205, 244, 65, 129, 77, 82,
106, 220, 55, 200, 108, 193, 171, 250, 36, 225, 123, 8, 12, 189, 177, 74,
120, 136, 149, 139, 227, 99, 232, 109, 233, 203, 213, 254, 59, 0, 29, 57,
242, 239, 183, 14, 102, 88, 208, 228, 166, 119, 114, 248, 235, 117, 75, 10,
49, 68, 80, 180, 143, 237, 31, 26, 219, 153, 141, 51, 159, 17, 131, 20]
For each block of 16 bytes, we will proceed with a “pass” on the checksum and do the following:
checksum = 16 * [0]
l = 0
blocks = math.ceil(N / BLOCK_SIZE)for i in range(blocks):
    for j in range(BLOCK_SIZE):
        l = PI_SUBST[(msg[i*BLOCK_SIZE+j] ^ l)] ^ checksum[j]
        checksum[j] = l
As you can see, for each bytes in the message :
- we find the surrogate in the S table, at the index: ascii value at the current message position XOR last calculated checksum position (initial state: 0)
- New checksum position is the surrogate xor current checksum position (initial state: 0)
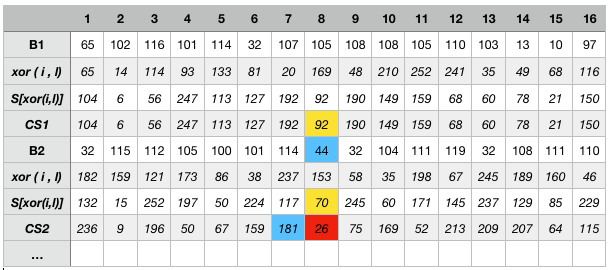
Let’s go back to our message and process the first letters “by hand”. If the XOR operation is ok to process with your preferred calculator, getting the surrogate from the S table can be a bit challenging. You can create a small script to help you. i is the msg current position, l is the previous calculated checksum position.

The above table is to reassure you when calculating (so you can feel you are on the right path). If we take the example of the calculation of the 8th position of the checksum, during the second pass (or second message block — red cell), we have the following:
xor (181, 44) = 153
S[153] = 70
xor (70, 92) = 26
You can swap XOR operands as XOR is commutative.
For our Haiku you should end up with the following checksum:
[167, 222, 15, 251, 92, 111, 246, 45, 79, 203, 11, 129, 245, 139, 5, 178]
Following the algorithm, we need to add this checksum as a new block of our message, which result in being as follow at that stage:

Don’t forget to update your code:
msg = msg + checksum
blocks += 1
Step 3: initialize digest
I’m a big fan of this “so useful” step:
md_digest = 48 * [0]Step 4: process the message in 16-bytes blocks
I would love to say that we enter now in the interesting part, but the step 2 was as well super-interesting.
Anyway, let’s continue this fabulous journey.
For this, you need to picture the md_digest buffer as segmented in 3 blocks of 16 bytes each, each of them will have a specific task. We will call them md_digest_0 / md_digest_1 / md_digest_2
Following the algorithm, this is what will append for each block:
- md_digest_1 = current block
- md_digest_2 = xor (md_digest_1, md_digest_0)
- 18 passes on the md_digest of xor operation and substitution through the S table.
In code:
for i in range(blocks):
    for j in range(BLOCK_SIZE):
        md_digest[BLOCK_SIZE+j] = msg[i*BLOCK_SIZE+j]
        md_digest[2*BLOCK_SIZE+j] = (md_digest[BLOCK_SIZE+j] ^ md_digest[j])    checktmp = 0    for j in range(18):
        for k in range(48):
            checktmp = md_digest[k] ^ PI_SUBST[checktmp]
            md_digest[k] = checktmp
        checktmp = (checktmp+j) % 256
If the first part is straightforward, the second part is the trick bit. Why 18 passes ? I can’t answer that question. If any of you have the answer, i’ll be happy to know.
Now, let’s keep in mind that most of the time hash functions are empirically created. Which means that all the operations might not have science backed reason to be / and to be that way.
We end up this step with the following hash value:
[16, 159, 142, 226, 78, 105, 28, 163, 49, 47, 33, 55, 4, 159, 19, 161, 211, 177, 59, 143, 64, 79, 220, 140, 190, 113, 197, 12, 244, 192, 47, 104, 174, 252, 102, 71, 161, 224, 170, 184, 56, 203, 66, 160, 241, 185, 197, 114]
Which brings us to finalization step.
Step 5: output
As you know, the 16 first bytes of the md_digest variable will represent our hash. But obviously it’s far from what you have already seen as hash representation of texts.
Hence we need to transform each value to hexadecimal value.
print("".join(map(lambda x: hex(x).lstrip("0x"), md_digest[0:16])))You’ll end up with this beautiful signature:
109f8ee24e691ca3312f213749f13a1
For our, beautiful as well, Haiku.
Conclusions
As said, my implementation is not meant to be scalable or beautiful but to help understand the algorithm. And potentially when we’ll go through more sophisticated algorithms we will be able to spot differences and similarities.
Remember, this algorithm has been proven unsafe, do not use it in critical applications.
If you have a second, think about the poetry behind hash functions :-)
Happy to reach out to further discuss if you have inputs, feedback nick@thecrypt.io
full code available here https://github.com/NickRHR/hashfunctions/blob/f12fde7ed92e2ad3f5973b30985dc5ec597afd95/MD2/MD2_nfc.py


